Did you know that root rot kills more orchids than any other single cause, accounting for nearly 60% of orchid deaths worldwide? If you’ve just discovered those telltale black, mushy roots on your beloved orchid, your heart probably sank with the fear that your plant is doomed.
Here’s the devastating reality: root rot spreads rapidly through orchid root systems, turning healthy white roots into decomposing black mush within days. Left untreated, it will kill your orchid completely. The panic you’re feeling right now? It’s completely justified.
But here’s the promise that will change everything: even severely root-rotted orchids can make complete recoveries when treated with the right methods. In the next 10 minutes, you’ll learn the exact step-by-step treatment protocol used by professional orchid growers to save plants that others would consider lost causes.
Understanding Orchid Root Rot: Signs and Causes
Visual Symptoms of Root Rot
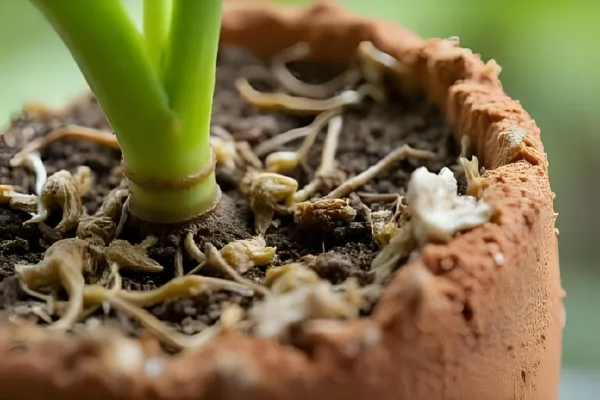
Root rot doesn’t announce itself subtly. Healthy orchid roots should be firm, plump, and typically white or green. When root rot strikes, you’ll notice distinct warning signs that demand immediate attention.
The most obvious symptom is root discoloration. Affected roots turn brown, black, or sometimes yellow, depending on the type of pathogen involved. These roots feel mushy or slimy when touched, completely different from the firm texture of healthy roots.
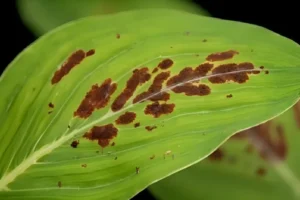
Above-ground symptoms often appear later but are equally telling. Your orchid’s leaves may develop yellow patches, become wrinkled despite regular watering, or show signs of dehydration even when the potting medium feels moist.
The pseudobulbs (if your orchid has them) might appear shriveled or develop dark spots. Most concerning is when new growth stops entirely, as this indicates the root system can no longer support the plant’s basic functions.
Common Causes of Orchid Root Rot
Overwatering remains the leading cause of root rot in orchid cultivation. Unlike terrestrial plants, most orchids are epiphytes in nature, meaning their roots are designed for excellent drainage and air circulation. When roots sit in constantly moist conditions, they become vulnerable to fungal and bacterial infections.
Poor drainage compounds this problem significantly. Dense potting media like regular potting soil, decomposed bark, or inadequate drainage holes create the perfect environment for root rot pathogens to flourish.
Contaminated tools and potting media can introduce harmful microorganisms directly to your orchid’s root system. Reusing old bark mix without sterilization or using tools that haven’t been disinfected between plants spreads pathogens efficiently.
Environmental stress factors also contribute. High humidity combined with poor air circulation, extreme temperature fluctuations, or repotting trauma can weaken orchid immune systems, making them more susceptible to root rot infections.
Different Types of Root Rot in Orchids
Fungal root rot, caused by pathogens like Fusarium and Rhizoctonia, typically presents as brown to black mushy roots with a characteristic foul smell. These fungi thrive in warm, moist conditions and can spread rapidly through the entire root system.
Bacterial root rot, often caused by Erwinia species, creates slimy, water-soaked roots that may appear translucent. This type of rot often has an extremely unpleasant odor and tends to progress more quickly than fungal infections.
Crown rot, while technically affecting the plant’s crown area, often originates from root rot that has spread upward. This condition threatens the plant’s central growing point and requires the most aggressive treatment approach.
Emergency Assessment: Is Your Orchid Salvageable?
Determining Severity Levels
The key to successful treatment lies in accurate assessment of damage extent. Remove your orchid from its pot completely and rinse the roots gently under lukewarm water to remove all potting medium. This gives you a clear view of the root system’s condition.
Mild root rot affects less than 30% of the root system, with most roots remaining firm and white or green. These cases have excellent recovery potential with proper treatment.
Moderate root rot involves 30-60% of the root system. You’ll see a mix of healthy and damaged roots, but sufficient healthy tissue remains to support the plant. Recovery is possible but requires careful monitoring.
Severe root rot affects more than 60% of the root system, leaving few healthy roots. These cases require aggressive treatment and have a lower but still possible recovery rate if any firm roots remain.
When Immediate Action Is Required
If you discover soft, black roots with a foul odor, you’re dealing with an active infection that will spread rapidly. Every hour of delay reduces your orchid’s survival chances significantly.
Signs that demand emergency treatment include: mushy roots that fall apart when touched, a strong unpleasant smell coming from the potting medium, or evidence that rot has reached the plant’s crown or pseudobulbs.
The presence of visible fungal growth on roots or potting medium indicates an advanced infection requiring immediate intervention. Similarly, if your orchid shows sudden collapse of leaves or pseudobulbs, the root rot has likely progressed beyond the root system.
Signs of Complete Loss vs. Recovery Potential
An orchid with no remaining firm roots faces extremely poor survival odds, but isn’t necessarily hopeless if the crown and pseudobulbs remain firm and healthy. Some orchids can regenerate new roots from healthy crown tissue.
Complete loss indicators include: a mushy, black crown; all pseudobulbs soft and discolored; and no firm tissue anywhere on the plant. These plants are beyond recovery and should be disposed of to prevent spreading infection to other orchids.
Recovery remains possible when you find even a few firm roots, any hard pseudobulbs, or a solid crown area. These healthy tissues can serve as the foundation for regenerating the entire root system.
Step-by-Step Orchid Root Rot Treatment Process
Tools and Materials Needed
Successful root rot treatment requires specific tools and materials prepared in advance. Gather sharp, sterilizable scissors or pruning shears, hydrogen peroxide (3% solution), rubbing alcohol (70% isopropyl), and fungicide specifically designed for orchids.
You’ll also need fresh, high-quality orchid bark mix, a clean pot with excellent drainage, latex or nitrile gloves, paper towels, and a clean workspace. Having rooting hormone powder can help encourage new root development in severely damaged plants.
Sterilize all tools with rubbing alcohol before use and keep the alcohol solution handy for re-sterilizing between cuts. This prevents accidentally spreading pathogens from infected to healthy tissue.
Safe Removal from Pot and Medium
Work in a well-ventilated area and wear gloves to protect both yourself and your orchid from contamination. Remove the orchid from its pot carefully, trying not to damage any remaining healthy roots.
Rinse the root system thoroughly under lukewarm running water to remove all old potting medium. Use your fingers to gently work away stubborn pieces, but avoid forcing anything that might damage healthy roots.
Lay the plant on a clean surface and examine the entire root system methodically. Take time to identify which roots are healthy versus infected, as this assessment guides your trimming decisions.
Root Inspection and Trimming Technique
Healthy roots should be firm to the touch and typically white, green, or silvery in color. Gently squeeze each root to test firmness – healthy roots won’t compress or feel squishy.
Using sterilized tools, cut away all soft, mushy, or discolored roots. Make cuts at least one inch into healthy tissue beyond any signs of infection to ensure complete removal of pathogens.
Re-sterilize your cutting tools with alcohol after each cut to prevent cross-contamination. This step is critical and should never be skipped, even when working on the same plant.
After trimming, you may be left with very few or even no roots. Don’t panic – orchids can recover from this situation with proper care and patience.
Disinfection Protocols
Soak the entire plant, including remaining roots and crown, in a 3% hydrogen peroxide solution for 10-15 minutes. This kills surface pathogens and helps prevent reinfection.
After the hydrogen peroxide treatment, rinse the plant thoroughly with clean water and allow it to air dry for 2-3 hours in a shaded, well-ventilated area. This drying period helps seal cut surfaces and reduces moisture that could encourage new infections.
Apply orchid-specific fungicide according to manufacturer instructions, paying special attention to cut surfaces and the crown area. Some growers prefer cinnamon powder as a natural antifungal alternative, dusting it onto cut surfaces.
Post-Treatment Care and Repotting Guidelines
Selecting Appropriate Growing Medium
Choose only fresh, high-quality orchid bark mix for repotting treated plants. Avoid reusing any old potting medium, as it may harbor pathogens that could cause reinfection.
The ideal mix should drain extremely well while providing some moisture retention. A combination of medium-grade fir bark, perlite, and sphagnum moss creates excellent drainage with appropriate moisture levels.
For orchids with severely reduced root systems, consider using a finer bark mix initially, as it provides better moisture retention to support new root development. You can transition to coarser bark as the root system recovers.
Proper Pot Selection and Drainage
Select a pot that’s actually smaller than the original, as orchids with reduced root systems need less space and better moisture control. The new pot should have multiple large drainage holes to ensure excess water can escape quickly.
Clear plastic pots offer the advantage of allowing you to monitor root recovery progress without disturbing the plant. You can easily see new root growth and check for any signs of recurring problems.
Ensure the pot size matches the current root system rather than the plant’s previous size. A pot that’s too large will hold too much moisture and potentially trigger new root rot problems.
Watering Schedule Adjustments
Drastically reduce watering frequency immediately after treatment. Plants with compromised root systems cannot process water normally and are extremely vulnerable to overwatering.
Water only when the potting medium is nearly completely dry. For most environments, this means watering every 10-14 days initially, compared to the typical 7-day schedule for healthy orchids.
Use the “soak and drain” method: water thoroughly until water runs out the drainage holes, then allow complete drainage before returning the plant to its growing location. Never allow the pot to sit in standing water.
Monitor the plant daily for signs of stress from either too much or too little water. Slightly wrinkled leaves are acceptable during recovery, but severe shriveling indicates the need for more frequent watering.
Environmental Considerations
Provide bright, indirect light during the recovery period. Direct sunlight can stress a plant that’s already working hard to rebuild its root system.
Maintain moderate humidity levels (50-60%) with excellent air circulation. High humidity without air movement can encourage new fungal growth, while low humidity stresses the recovering plant unnecessarily.
Keep temperatures stable in the 65-80°F range, avoiding significant fluctuations that could stress the plant during its vulnerable recovery period.
Recovery Monitoring and Long-Term Prevention
Signs of Successful Recovery
New root growth is the most encouraging sign of recovery, typically appearing 4-8 weeks after treatment. These new roots should be firm and white or green, indicating healthy development.
Improved leaf turgor (firmness) suggests the plant is successfully absorbing water through its recovering root system. Leaves should gradually become more plump and vibrant.
New growth from the crown or pseudobulbs indicates the plant has sufficient energy and root function to support active development. This typically occurs 2-3 months into the recovery process.
Common Mistakes During Recovery Period
The most frequent error is resuming normal watering schedules too quickly. Recovering orchids need significantly less water than healthy plants, and overwatering remains the primary cause of treatment failure.
Moving the plant too soon to its normal growing location can stress the recovering root system. Maintain stable, moderate conditions until the plant shows clear signs of robust recovery.
Fertilizing during early recovery diverts energy away from root development and can actually slow the healing process. Wait until you see significant new root growth before resuming any feeding program.
Repotting again too soon disrupts developing roots and can set back recovery significantly. Allow at least 6-12 months for root system establishment before considering repotting again.
Preventive Measures for Future Protection
Establish a consistent but conservative watering routine based on your specific growing conditions. Check potting medium moisture levels regularly rather than watering on a fixed schedule.
Replace potting medium every 12-18 months before it begins to decompose, as decomposing bark creates conditions favorable to root rot development.
Sterilize all tools between plants and quarantine new orchids for 2-3 weeks to prevent introducing pathogens to your collection.
Monitor your orchids weekly for early signs of stress or disease. Early detection and treatment prevent minor problems from becoming major disasters.
Conclusion
Root rot doesn’t have to mean the end of your orchid. With proper identification, aggressive treatment, and careful post-treatment care, even severely affected plants can make complete recoveries.
Remember that recovery takes time – typically 3-6 months for full root system regeneration. Patience during this period is crucial for success.
The key prevention strategy is understanding that orchids prefer to dry out between waterings. When in doubt, wait another day before watering. This simple rule prevents most root rot cases from ever developing.
Your orchid’s recovery journey teaches valuable lessons about proper care that will benefit all your future orchid growing endeavors.
Frequently Asked Questions
How long does it take for an orchid to recover from root rot?
Complete recovery typically takes 3-6 months, depending on the severity of damage and the plant’s overall health. New root growth usually appears within 4-8 weeks of treatment.
Can an orchid survive with no roots at all?
Yes, orchids can survive rootless conditions if the crown and pseudobulbs remain healthy. However, recovery is slower and requires extremely careful moisture management during the regeneration period.
Should I use fungicide on my orchid after treating root rot?
Yes, applying orchid-specific fungicide helps prevent reinfection during the vulnerable recovery period. Follow manufacturer instructions and avoid overuse, which can damage beneficial microorganisms.
How often should I water my orchid during recovery from root rot?
Water only when the potting medium is nearly completely dry, typically every 10-14 days initially. This is much less frequent than normal watering schedules but essential for preventing reinfection.
What’s the best potting medium for orchids recovering from root rot?
Use fresh, high-quality orchid bark mix with excellent drainage. For severely damaged plants, a finer bark mix initially provides better moisture retention to support new root development.
Can I save an orchid if the crown has root rot?
Crown rot is more serious than root rot alone, but recovery is still possible if any firm tissue remains. Remove all affected areas and treat aggressively with fungicide, though success rates are lower.
How can I tell if my treatment is working?
Look for new root growth (firm and white or green), improved leaf turgor, and eventually new growth from the crown. These signs typically appear 4-8 weeks after successful treatment.
What should I do if root rot returns after treatment?
Re-examine your watering practices and environmental conditions. Recurring root rot usually indicates ongoing moisture management problems or contaminated growing conditions that need addressing.