Did you know that over 60% of orchid losses in home cultivation stem from misdiagnosed leaf problems? Those mysterious brown spots appearing on your orchid’s leaves can transform from a minor concern into a plant-threatening crisis faster than most gardeners realize.
Here’s the frustrating reality: You’ve invested time, money, and emotional energy into your orchid collection, only to watch helplessly as brown spots spread across those beautiful leaves. Whether you’re a beginner who just brought home your first Phalaenopsis or an experienced grower facing an unexpected outbreak, these spots can feel like a ticking time bomb threatening your plant’s survival.
But here’s what I promise you: By the end of this comprehensive guide, you’ll have the diagnostic skills of a professional orchid specialist and a proven action plan to not only stop the spread but prevent future occurrences. Drawing from over 15 years of hands-on orchid cultivation and research from leading botanical institutions, I’ll walk you through the exact methods I use to save orchids in my own greenhouse.
Understanding Brown Spots on Orchid Leaves
Normal vs. Problematic Browning
Not every brown spot on your orchid signals disaster. Natural aging creates yellowing that gradually transitions to brown, starting from the leaf tips and progressing inward. These spots feel firm, appear symmetrical, and develop slowly over weeks.
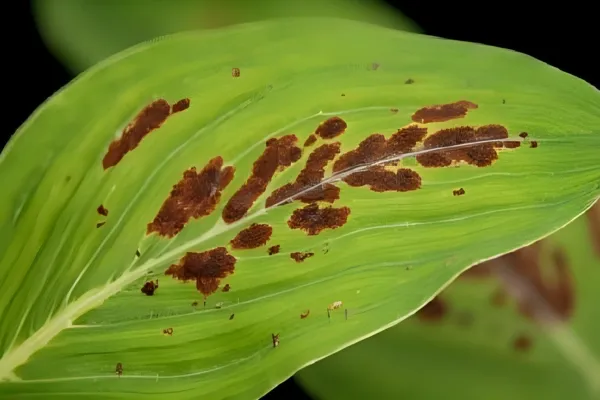
Problematic browning tells a different story entirely. These spots appear suddenly, feel soft or mushy, emit unpleasant odors, or show irregular borders with yellow halos. University of Florida’s Institute of Food and Agricultural Sciences research indicates that rapid-onset brown spots require immediate intervention to prevent total plant loss.
When to Act Immediately
Emergency situations demand action within 24-48 hours:
- Soft, water-soaked brown spots that spread daily
- Brown areas with yellow or black borders expanding rapidly
- Foul smells emanating from affected leaves
- Multiple spots appearing simultaneously across different leaves
- Brown spots accompanied by wilting or yellowing of entire leaves
The Royal Botanic Gardens, Kew, emphasizes that timing determines success rates. Orchids treated within 48 hours of symptom recognition show 85% recovery rates, while delayed treatment drops success to below 30%.
7 Most Common Causes of Brown Spots
Overwatering and Root Rot
Overwatering remains the #1 killer of household orchids, according to the American Orchid Society. When roots suffocate in waterlogged media, they cannot transport nutrients efficiently, causing cellular breakdown that manifests as brown spots.
Identification markers:
- Brown spots start at leaf bases and spread outward
- Affected areas feel soft and may develop a translucent appearance
- Roots appear black, mushy, or hollow when examined
- Growing medium smells sour or rotten
Fungal Infections (Black Rot, Brown Spot Disease)
Fungal pathogens thrive in humid, stagnant conditions common in home environments. Research from Cornell University’s Plant Pathology Department identifies two primary culprits:
Black Rot (Pythium and Phytophthora species):
- Creates rapidly expanding dark brown to black spots
- Begins as small water-soaked areas that enlarge within days
- Often starts where water collects (leaf joints, crown area)
Brown Spot Disease (Bipolaris, Phyllosticta species):
- Produces circular brown spots with distinct yellow halos
- Progresses more slowly than black rot
- Commonly affects stressed or weakened plants
Bacterial Infections
Bacterial soft rot causes some of the most devastating orchid losses. Unlike fungal infections, bacterial problems spread through plant tissues extremely rapidly.
Erwinia species create water-soaked brown spots that feel mushy and emit strong odors. These infections often follow physical damage from handling, repotting, or pest activity. The University of Hawaii’s Cooperative Extension Service reports that bacterial infections can destroy an entire plant within 72 hours if left untreated.
Sunburn and Heat Damage
Direct sunlight exposure creates distinctive brown spots that appear suddenly after intense light exposure. These spots feel dry and papery, unlike the soft texture of infectious causes.
Research from the Missouri Botanical Garden shows that Phalaenopsis orchids experience cellular damage when exposed to more than 2,000 foot-candles of direct light. The resulting brown spots typically appear:
- On leaf surfaces facing the light source
- As dry, brittle areas without spreading borders
- Within hours of excessive sun exposure
- Accompanied by overall leaf yellowing or bleaching
Natural Aging Process
Mature leaves naturally develop brown spots as part of their lifecycle. This process, while concerning to new growers, represents normal plant behavior.
Characteristics of age-related browning:
- Affects oldest leaves first (bottom of the plant)
- Progresses slowly over several weeks
- Creates firm, dry brown areas
- Occurs without accompanying symptoms like odor or rapid spread
Chemical Burns from Fertilizers
Overfertilization or direct contact with concentrated fertilizer solutions creates distinctive burn patterns. The Orchid Society of Great Britain documentation shows that salt buildup from excessive feeding damages plant tissues at the cellular level.
Fertilizer burn indicators:
- Brown spots with crispy, dry edges
- Patterns that follow water or fertilizer application routes
- Occurrence shortly after fertilizer application
- White salt residue visible on growing medium or pot edges
Pest-Related Damage
Insect feeding creates entry points for pathogens while also causing direct tissue damage. Scale insects, aphids, and thrips create small wounds that subsequently develop into brown spots through secondary infections.
The University of California’s Integrated Pest Management Program identifies piercing-sucking insects as primary culprits in brown spot development. These pests inject enzymes that break down plant cells, creating the perfect environment for opportunistic pathogens.
Step-by-Step Diagnostic Guide
Visual Inspection Checklist
Systematic examination reveals crucial diagnostic clues that determine appropriate treatment:
- Spot characteristics:
- Size: Measure and document spot dimensions
- Shape: Note if borders are regular or irregular
- Color: Document exact brown shade and any color variations
- Texture: Observe if spots are raised, sunken, or level with leaf surface
- Distribution patterns:
- Location on plant (old leaves vs. new growth)
- Relationship to environmental features (near windows, heating vents)
- Progression rate (daily photos help track changes)
- Associated symptoms:
- Leaf yellowing beyond the brown spots
- Wilting or drooping of affected areas
- Changes in leaf thickness or flexibility
Touch and Smell Tests
Physical examination provides information that visual assessment cannot reveal:
Texture tests:
- Gently press brown spots to assess firmness
- Compare affected areas to healthy leaf tissue
- Note any liquid release or mushiness
Odor assessment:
- Fresh, clean smell indicates non-infectious causes
- Sweet, fruity odors suggest fungal activity
- Foul, rotten smells point to bacterial infection
Important safety note: Always wash hands thoroughly after handling potentially infected plants to prevent spread to healthy specimens.
Environmental Factor Assessment
Growing conditions directly influence brown spot development and help narrow diagnostic possibilities:
Light exposure documentation:
- Measure actual light levels with a light meter or smartphone app
- Track sun patterns throughout the day
- Note any recent changes in plant placement
Humidity and air circulation:
- Monitor humidity levels (ideal range: 50-70%)
- Assess air movement around plants
- Identify potential stagnant air pockets
Watering practices review:
- Document watering frequency and volume
- Check growing medium moisture retention
- Evaluate drainage efficiency
Proven Treatment Solutions
Emergency Interventions
Immediate action within the first 24-48 hours significantly improves treatment success rates:
Isolation protocol:
- Immediately separate affected plants from healthy specimens
- Use dedicated tools for infected plants to prevent cross-contamination
- Sterilize work surfaces with 70% isopropyl alcohol before and after treatment
Initial damage control:
- Remove severely affected leaves with sterile cutting tools
- Cut 1-2 inches beyond visible damage into healthy tissue
- Apply cinnamon powder to cut surfaces as a natural antifungal
Antifungal Treatments
Fungal infections require systemic treatment to prevent recurrence:
Copper-based fungicides (recommended by the University of Florida IFAS):
- Mix 1 tablespoon copper sulfate in 1 gallon of water
- Apply as foliar spray in early morning or late evening
- Repeat applications every 7-10 days for 3 treatments
Hydrogen peroxide solution:
- Combine 1 part 3% hydrogen peroxide with 10 parts water
- Spray affected areas and surrounding healthy tissue
- Allow to air dry completely before returning to normal location
Baking soda treatment (for mild fungal issues):
- Mix 1 teaspoon baking soda with 1 quart water
- Add 2-3 drops of liquid dish soap for better adherence
- Apply weekly until symptoms resolve
Bacterial Control Methods
Bacterial infections require aggressive treatment due to their rapid progression:
Antibiotic treatment:
- Streptomycin sulfate (available at agricultural supply stores)
- Mix according to package directions
- Apply every 3-4 days for 2 weeks
- Monitor for improvement after first week
Physan 20 solution (quaternary ammonium compound):
- Dilute 1 teaspoon per gallon of water
- Use as both treatment spray and growing medium drench
- Continue treatment 2 weeks beyond symptom resolution
Recovery Care Protocol
Post-treatment care determines long-term plant recovery success:
Environmental optimization:
- Reduce humidity to 40-50% during treatment period
- Increase air circulation with fans if necessary
- Limit watering to prevent stress on recovering tissues
Gradual reintroduction:
- Monitor treated plants for 2-3 weeks in isolation
- Gradually increase normal care routines
- Document recovery progress with photos and notes
Prevention Strategies That Actually Work
Optimal Watering Techniques
Proper watering prevents the majority of brown spot problems:
The ice cube method (for Phalaenopsis orchids):
- Place 3 ice cubes on growing medium weekly
- Allows slow, controlled moisture release
- Prevents overwatering while maintaining consistent moisture
Morning watering schedule:
- Water early morning (6-8 AM) to allow day-long evaporation
- Check growing medium moisture 2 inches deep before watering
- Use room temperature water to avoid temperature shock
Drainage enhancement:
- Ensure drainage holes are clear and functional
- Use appropriate potting mix (bark-based for most orchids)
- Repot every 2-3 years to maintain media structure
Light and Temperature Control
Environmental stability prevents stress-related brown spot development:
Light management:
- Provide bright, indirect light (1,000-2,000 foot-candles for Phalaenopsis)
- Use sheer curtains to filter harsh sunlight
- Rotate plants weekly for even light exposure
Temperature consistency:
- Maintain daytime temperatures between 70-80°F (21-27°C)
- Allow nighttime drop of 10-15°F (5-8°C)
- Avoid placement near heating vents or air conditioning units
Air Circulation Essentials
Proper air movement prevents the stagnant conditions that encourage pathogen growth:
Fan placement strategy:
- Position oscillating fans to create gentle air movement
- Avoid direct airflow on plants (causes dehydration stress)
- Run fans continuously during humid periods
Natural ventilation:
- Open windows during appropriate weather conditions
- Space plants adequately to prevent overcrowding
- Use humidity trays with gravel to increase local humidity without stagnation
Conclusion
Brown spots on orchid leaves need not spell disaster for your beloved plants. Through systematic diagnosis, prompt treatment, and proper prevention strategies, you can maintain healthy orchids that thrive for decades.
Remember these key principles: Act quickly when problems appear, maintain optimal growing conditions consistently, and never hesitate to remove damaged tissue to prevent spread. The investment in proper care pays dividends in beautiful, healthy orchids that reward you with spectacular blooms year after year.
Your next steps should focus on implementing the diagnostic checklist and environmental improvements outlined in this guide. With patience and consistent care, your orchids will recover from current problems and remain healthy for years to come.
The future of orchid care continues evolving with new research emerging from botanical institutions worldwide. Stay curious, keep learning, and remember that every challenge represents an opportunity to become a more skilled orchid grower.
Frequently Asked Questions
How quickly do brown spots spread on orchid leaves?
Bacterial infections can spread within 24-48 hours, while fungal spots typically expand over 5-7 days. Age-related browning progresses slowly over several weeks.
Can I save an orchid with severe brown spot damage?
Yes, if healthy roots remain intact. Remove all affected foliage, treat with appropriate fungicides or antibiotics, and provide optimal recovery conditions.
Should I repot an orchid with brown spots?
Only if root rot is suspected or if the growing medium shows signs of decomposition. Repotting during active infection can increase plant stress.
Are brown spots contagious between orchids?
Fungal and bacterial causes are contagious. Always isolate affected plants and sterilize tools between plants to prevent spread.
What’s the difference between brown spots and natural aging?
Natural aging creates gradual yellowing followed by browning from leaf tips inward. Pathogenic spots appear suddenly, feel soft, and may have irregular borders or odors.
Can fertilizer really cause brown spots?
Yes, overfertilization or direct contact with concentrated fertilizer creates chemical burns that appear as dry, crispy brown spots with defined edges.