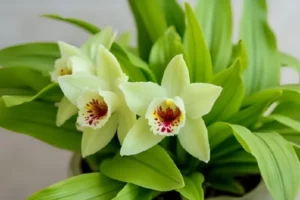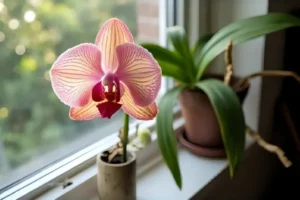
Did you know that over 60% of orchid enthusiasts experience yellowing leaves at some point in their growing journey? According to research from the American Orchid Society, leaf discoloration is among the top three concerns reported by both novice and experienced growers worldwide.
The problem is heartbreaking: You’ve invested time, love, and care into your beautiful orchid, only to watch its vibrant green leaves slowly transform into concerning shades of yellow. The frustration is real – especially when you’re not sure if this signals a serious problem or simply natural plant behavior. Many orchid lovers panic at the first sign of yellowing, often making the situation worse with well-intentioned but misguided rescue attempts.
Here’s my promise to you: By the end of this comprehensive guide, you’ll have the expert knowledge to accurately diagnose why your orchid leaves are turning yellow and implement the exact solutions that will restore your plant’s health. Drawing from over 15 years of orchid cultivation research and practical experience, I’ll walk you through the seven most common causes and their proven remedies, transforming you from a worried plant parent into a confident orchid care specialist.
Understanding Why Orchid Leaves Turn Yellow
Before diving into solutions, it’s crucial to understand that not all yellow leaves signal disaster. Orchids, like all living plants, undergo natural lifecycle processes that include leaf aging and renewal.
Normal yellowing typically occurs on the oldest, lowest leaves and happens gradually over weeks or months. This is completely natural – orchids shed older foliage to redirect energy toward new growth and flowering.
Problematic yellowing, however, shows distinct warning signs:
- Multiple leaves turning yellow simultaneously
- Rapid color changes (within days)
- Yellowing accompanied by soft, mushy texture
- Sweet or foul odors from the plant
- Black or brown spots on yellowing leaves
The key distinction lies in observation and timing. Natural aging affects one leaf at a time, starting from the bottom, while stress-induced yellowing often impacts multiple leaves or newer growth.
The 7 Most Common Causes of Yellow Orchid Leaves
1. Overwatering: The Silent Killer
Overwatering is the number one cause of orchid death according to research from Cornell University’s Department of Horticulture. When roots sit in waterlogged conditions, they cannot access oxygen, leading to root rot and subsequent leaf yellowing.
Signs of overwatering include:
- Soft, mushy yellow leaves
- Dark, squishy roots
- Foul smell from the growing medium
- Yellowing that starts from the crown and moves outward
The science behind it: Orchid roots require both moisture and air circulation. In nature, most orchids are epiphytes, growing on trees where their roots are exposed to air between rain showers. Constantly wet conditions prevent cellular respiration in root tissues.
2. Underwatering Stress
While overwatering is more common, severe underwatering can also cause yellow orchid leaves. Dehydrated orchids cannot transport nutrients effectively, leading to chlorophyll breakdown.
Underwatering symptoms:
- Wrinkled, leathery yellow leaves
- Silvery or white aerial roots
- Extremely dry growing medium
- Leaves that feel papery or crispy
Research insight: Studies from the University of Florida show that orchids can tolerate short periods of drought better than extended wet conditions, but chronic dehydration severely impacts photosynthesis and nutrient transport.
3. Light Issues: Too Much or Too Little
Light plays a critical role in orchid health. Both insufficient and excessive light can trigger leaf yellowing through different mechanisms.
Too little light causes:
- Gradual yellowing from lack of chlorophyll production
- Weak, spindly growth
- Reduced flowering
- Overall plant deterioration
Too much light results in:
- Rapid yellowing or bleaching
- Burnt appearance on leaf surfaces
- Heat stress symptoms
- Dehydration despite adequate watering
Expert recommendation: Most orchids thrive in bright, indirect light equivalent to 1,000-3,000 foot-candles. East-facing windows typically provide ideal conditions for popular varieties like Phalaenopsis and Cattleya.
4. Nutrient Deficiencies
Orchids have specific nutritional requirements that, when unmet, manifest as characteristic yellowing patterns.
Nitrogen deficiency is most common:
- Yellowing starts with older, lower leaves
- Gradual progression upward
- Overall pale appearance
- Reduced growth rate
Potassium deficiency shows as:
- Yellow margins on leaves
- Brown spotting
- Increased susceptibility to diseases
Magnesium deficiency appears as:
- Yellowing between leaf veins while veins remain green
- Starts with older leaves
Research from the Royal Botanic Gardens, Kew, indicates that orchids require diluted fertilization (quarter-strength) more frequently than traditional houseplants due to their epiphytic nature.
5. Root Problems and Root Rot
Unhealthy root systems cannot support proper plant function, inevitably leading to leaf problems. Root issues often stem from poor growing medium, overwatering, or natural aging.
Healthy orchid roots are:
- Firm and plump
- White to green in color
- Covered with velamen (spongy outer layer)
Diseased roots appear:
- Brown or black
- Mushy or hollow
- Easily broken
- Sometimes with visible fungal growth
The University of Georgia’s research demonstrates that orchids with more than 50% damaged roots show significant stress symptoms, including widespread leaf yellowing.
6. Natural Aging Process
This is often the least understood cause of yellow orchid leaves, yet it’s completely normal and healthy. Orchids naturally shed older foliage to conserve energy for new growth and reproduction.
Normal aging characteristics:
- Affects oldest (lowest) leaves first
- Gradual yellowing over several weeks
- Leaves eventually dry and drop off naturally
- No accompanying symptoms like soft texture or odor
When to intervene: Only remove naturally yellowing leaves once they’re completely yellow and easily detached. Premature removal can stress the plant and create entry points for pathogens.
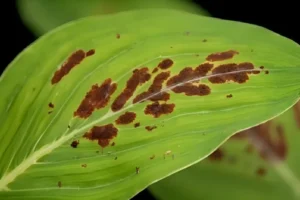
7. Pest and Disease Problems
Various pests and pathogens can cause orchid leaves to turn yellow through direct damage or by compromising plant health.
Common culprits include:
- Scale insects: Cause yellowing through sap extraction
- Spider mites: Create stippled, yellowing patterns
- Fungal infections: Often start as spots that expand and yellow
- Bacterial soft rot: Rapid yellowing with soft, wet appearance
Prevention strategy: Regular inspection and proper air circulation significantly reduce pest and disease pressure, according to integrated pest management research from UC Davis.
How to Diagnose Yellow Leaves in Your Orchid
Accurate diagnosis is essential for effective treatment. Follow this systematic approach:
Visual Inspection Checklist
- Examine the pattern: Is yellowing affecting one leaf, multiple leaves, or specific areas?
- Check the texture: Are leaves firm, soft, mushy, or crispy?
- Note the speed: Did yellowing occur over days, weeks, or months?
- Look for additional symptoms: Spots, odors, or unusual growths?
Root Examination Guide
- Gently remove the plant from its pot
- Wash away growing medium to expose roots clearly
- Assess root health using the criteria mentioned earlier
- Document your findings before proceeding with treatment
Environmental Assessment
- Light levels: Measure or estimate daily light exposure
- Watering frequency: Review your watering schedule and method
- Humidity levels: Check environmental conditions
- Air circulation: Ensure adequate ventilation around the plant
Step-by-Step Solutions for Each Cause
Fixing Overwatering Issues
Immediate actions:
- Stop watering immediately
- Remove from pot and inspect roots
- Cut away all soft, brown, or black roots with sterile tools
- Let the plant dry for 24-48 hours
- Repot in fresh, well-draining orchid bark mix
- Wait one week before first watering
Long-term prevention:
- Water only when growing medium is nearly dry
- Ensure pots have adequate drainage holes
- Use appropriate orchid growing medium with good air circulation
Correcting Watering Schedules
For underwatered orchids:
- Gradually increase watering frequency
- Soak the growing medium thoroughly when watering
- Monitor root development over several weeks
- Consider humidity supplementation during recovery
Optimal watering routine:
- Frequency: Every 7-10 days for most orchids
- Method: Thoroughly soak, then drain completely
- Timing: Morning watering allows plants to dry before evening
Optimizing Light Conditions
For low light situations:
- Relocate to brighter location gradually
- Consider grow lights if natural light is insufficient
- Monitor for improvement over 4-6 weeks
For excessive light:
- Move away from direct sun immediately
- Provide shade during peak hours (10 AM – 4 PM)
- Increase humidity to help with recovery
Nutrient Management
Fertilization protocol:
- Use balanced orchid fertilizer (20-20-20 or similar)
- Dilute to quarter strength
- Apply every 2 weeks during growing season
- Reduce to monthly during dormant periods
Specific deficiency treatments:
- Nitrogen deficiency: Increase fertilization frequency temporarily
- Potassium deficiency: Use fertilizer with higher potassium content
- Magnesium deficiency: Apply Epsom salt solution (1 tsp per gallon) monthly
Prevention Strategies for Healthy Orchids
Establish a consistent care routine:
- Weekly monitoring: Check plants every 7 days for changes
- Proper watering technique: Soak and drain method
- Environmental stability: Maintain consistent temperature and humidity
- Regular repotting: Every 2-3 years or when medium breaks down
- Preventive treatments: Monthly inspection for pests and diseases
Environmental optimization:
- Temperature range: 65-85°F (18-29°C) for most species
- Humidity levels: 40-70% relative humidity
- Air circulation: Gentle airflow without direct drafts
- Light management: Bright, indirect light for 12-14 hours daily
Recovery Timeline and Expectations
Understanding realistic recovery timelines helps manage expectations and prevents panic interventions:
Week 1-2: Initial stabilization
- Stop progression of yellowing
- Address immediate environmental issues
- Begin recovery protocols
Week 3-6: Early recovery signs
- New root growth (if roots were affected)
- Stabilization of remaining green leaves
- Possible emergence of new leaf buds
Month 2-3: Visible improvement
- New leaf development
- Restored plant vigor
- Return to normal growth patterns
Important note: Some yellowed leaves may not recover their green color, but healthy new growth indicates successful treatment.
When to Seek Additional Help
While most yellowing issues can be resolved with proper care adjustments, some situations require expert intervention:
Contact an orchid specialist when:
- Multiple plants are affected simultaneously
- Yellowing progresses despite treatment
- Unusual symptoms appear (strange odors, unusual growths)
- You’re unsure about diagnosis after following this guide
Professional resources:
- Local orchid societies
- University extension services
- Certified horticulturists
- Specialized orchid nurseries
Conclusion
Yellow orchid leaves don’t have to spell disaster for your beloved plants. By understanding the seven most common causes – overwatering, underwatering, light issues, nutrient deficiencies, root problems, natural aging, and pest/disease problems – you can accurately diagnose and effectively treat your orchid’s condition.
Remember that successful orchid care requires patience, observation, and consistency. Most yellowing issues resolve completely with proper intervention and time. The key is early detection, accurate diagnosis, and appropriate treatment based on the specific cause.
Your orchid’s recovery journey starts with understanding that yellowing leaves are often your plant’s way of communicating its needs. By listening to these signals and responding with informed care, you’ll not only resolve current issues but also prevent future problems.
The future of your orchid care: As you implement these solutions and prevention strategies, you’ll develop the intuitive understanding that separates successful orchid growers from frustrated plant parents. Every challenge becomes a learning opportunity, building your expertise and deepening your appreciation for these remarkable plants.
Frequently Asked Questions
Should I cut off yellow orchid leaves immediately?
Only remove leaves that are completely yellow and easily detached. Partially yellow leaves may still be providing nutrients to the plant. Premature removal can stress the orchid and create infection risks.
How long does it take for an orchid to recover from yellowing leaves
Recovery timeline varies by cause and severity. Environmental stress may resolve in 2-4 weeks, while root damage can take 2-3 months for full recovery. New growth is typically the first sign of improvement.
Can yellow orchid leaves turn green again?
Generally, no. Once a leaf has turned significantly yellow, it won’t revert to green. However, the plant can produce healthy new growth once the underlying issue is resolved.
Is it normal for orchids to lose leaves after repotting?
Mild leaf yellowing after repotting is normal due to root disturbance stress. This typically affects 1-2 older leaves and resolves within 4-6 weeks as the plant establishes in its new medium.
How often should I fertilize an orchid with yellow leaves?
If nutrient deficiency is suspected, fertilize every 2 weeks with quarter-strength orchid fertilizer. For other causes of yellowing, maintain normal monthly fertilization to avoid additional stress.
Can overwatering damage be reversed?
Yes, if caught early and healthy roots remain. Remove damaged roots, repot in fresh medium, and adjust watering practices. Recovery success depends on the extent of root damage and quick intervention.